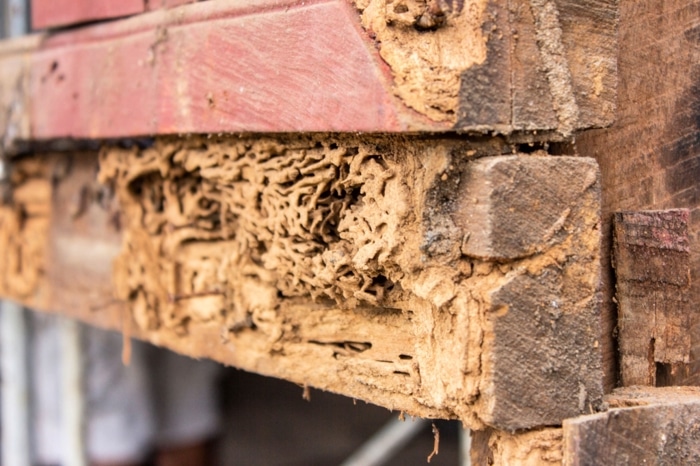
When it comes to maintaining a healthy and safe home environment, regular pest inspections are as crucial as any home maintenance routine. Think of it as a health check-up for your home. Just as you wouldn’t ignore a strange noise from your car’s engine, you shouldn’t overlook the signs of potential pest infestations. Pest inspections can unearth hidden problems, from silent termite damage to hidden rodent nests. This guide is your roadmap to preparing your home for a thorough pest inspection, ensuring no corner is left unchecked.
Understanding Pest Inspections: What to Expect
Pest inspections are more than just a cursory glance around your home. They are detailed examinations conducted by professionals trained to spot the subtle signs of pest infestations. During an inspection, an expert will methodically review your home, both inside and out. This includes checking walls, floors, ceilings, and foundation for signs of damage or intrusion, inspecting roof spaces and underfloor areas, and examining outdoor areas for potential pest harborage sites.

Ensure a Pest-Free Home All Year
with Pest Share!
The common culprits in most homes include termites, rodents, cockroaches, and ants, among others. Each pest leaves unique traces, like mud tubes for termites or droppings for rodents. An experienced inspector knows these signs and understands the behaviors of different pests, which helps in accurately diagnosing your home’s pest health.
How to Prepare for a Pest Inspection
Preparing for a pest inspection is like setting the stage for a successful performance. Your role is to ensure that every part of your home is accessible and ready for examination. Here’s how:
Accessibility is Key:
Make sure the inspector has unobstructed access to every part of your home, including attics, basements, closets, and any utility rooms. This might mean moving furniture, boxes, or other belongings temporarily.
Clean and Declutter:
A clean home makes it easier to spot signs of pests. Plus, clutter can hide evidence of infestations. Tidying up and reducing clutter not only aids the inspector but also minimizes hiding spots for pests.
Note Down Observations:
If you’ve noticed any peculiar signs, like unusual sounds within walls, visible damage, or droppings, make a note of them to share with the inspector. Your insights can be incredibly valuable.
Prepare for a Comprehensive Review:
Remember, the inspector will need to check both the interiors and exteriors, including hard-to-reach spaces. Ensure that gates are unlocked and there are no pets in the way.
Focus on the Kitchen: A Pest Hotspot
The kitchen is often the heart of pest activity in many homes, thanks to the abundance of food and water sources. Here’s how to prepare this critical area for inspection:
Empty Cabinets and Pantries:
Remove items from cabinets and pantries to allow the inspector to check for signs of pests, like rodent droppings or insect trails.
Clean Appliances:
Clean under and behind appliances like stoves, refrigerators, and dishwashers. Crumbs and spills can attract pests, and cleaning these areas beforehand will give a clearer view.
Seal Food Items:
Store food in airtight containers to minimize attractants. This includes pet food, which should also be stored securely.
Address Moisture Issues:
Check under sinks for leaks or dampness, as moisture attracts many pests. Make sure any issues are addressed before the inspection.
Prepping Your Living Areas and Bedrooms
Living areas and bedrooms, the epicenters of relaxation and comfort, can unfortunately also become sanctuaries for pests. To ensure these areas are well-prepared for an inspection, follow these steps:
Declutter and Clean:
Begin with a thorough decluttering. Piles of clothes, books, and other items can provide perfect hiding spots for pests. Vacuum carpets, clean under furniture, and ensure no area is left unchecked.
Inspect Upholstered Furniture:
Sofas, armchairs, and mattresses can harbor bed bugs and other pests. Remove cushions, vacuum crevices, and inspect for any signs of infestation, such as tiny blood spots or shed skins.
Check Window Frames and Baseboards:
These are common entry points for pests. Clean them and look for any cracks or crevices that might need sealing.
Prepare for a Detailed Inspection:
Ensure closets, wardrobes, and drawers can be easily accessed by the inspector. They’ll need to check these areas for signs of pests, especially if you’ve noticed moths or other insects in your clothing.
Bathrooms and Utility Areas: Not to be Overlooked
Bathrooms and utility areas are often hotspots for moisture-loving pests. Preparing these areas for inspection involves a few key steps:
Address Moisture Issues:
Check for leaky faucets, pipes, and damp areas. Pests like cockroaches and silverfish thrive in moist environments. Fixing any leaks or ventilation issues is crucial.
Clear Out Under-Sink Areas:
Remove items stored under sinks to give the inspector clear access. This also allows you to inspect these areas for signs of pests or moisture.
Organise Laundry and Utility Rooms:
Ensure that laundry baskets are empty and floors are clear. Inspect appliances and storage units for any signs of pest activity.
Inspect Drains:
Make sure drains are clean and functioning properly. Some pests can enter homes through drains, so keeping them in good condition is important.
How to Prepare for Termite Inspection
Termites, the silent destroyers, require special attention during an inspection. Preparing your home for a termite inspection involves:

Clear the Perimeter of Your House:
Ensure that there is at least a foot of clear space around the exterior of your home. This includes moving plants, mulch, and debris away from the foundation.
Provide Access to Crawl Spaces and Basements:
Termites often enter homes from below ground. Make sure that your inspector can easily access crawl spaces, basements, and subfloor areas.
Inspect Wood Structures:
Look over any wooden structures in your home, such as decks, patios, and fences, for signs of termite damage. This includes checking for hollow-sounding wood and mud tubes.
Remove Items from Garage Walls:
If your garage is attached to your house, move items away from walls to allow the inspector to check for termite entry points.
Note Signs and Share with the Inspector:
If you’ve noticed signs like discarded wings, mud tubes, or damaged wood, point these out to the inspector.
Pest Control Preparation: Securing Outdoor Areas
The great outdoors is not just a haven for us but also for various pests. Preparing your outdoor spaces for a pest inspection is as vital as the interior prep work. Here’s what you need to do:
Tidy Up the Garden and Yard:
Trim overgrown vegetation, especially those touching your home’s exterior, as they can act as bridges for pests. Clear away leaf litter, debris, and any stagnant water – a perfect breeding ground for mosquitoes.
Inspect Outdoor Structures:
Sheds, garages, and other outdoor buildings should be checked for signs of pest activity. Look for nests, burrows, or damage that could indicate the presence of rodents, termites, or other pests.
Manage Waste and Compost Areas:
Ensure that garbage and compost bins are sealed and located away from the house. These can attract a variety of pests, from rodents to insects.
Prepare for an External Review:
Make sure the inspector has access to all outdoor areas, including fences, walls, and garden beds. They’ll be looking for signs of pests as well as conditions that might attract them.
After the Inspection: Next Steps
Once the pest inspection is completed, the next steps depend on the findings. If pests are found, the inspector will likely recommend a treatment plan. It’s important to discuss this plan in detail, understanding the methods and products used, especially if you have pets or children.
If no pests are detected, don’t just breathe a sigh of relief. Use the inspector’s feedback to maintain a pest-free environment. Regular cleaning, proper food storage, sealing entry points, and managing moisture are all ongoing tasks that will help keep pests at bay.
Conclusion
Preparing for a pest inspection might seem like a chore, but it’s an investment in your home’s health and your peace of mind. By following these guidelines, you’re not just setting the stage for a successful inspection; you’re also reinforcing your defenses against these unwelcome intruders. So, roll up those sleeves and remember, a little preparation goes a long way in keeping your home happy, healthy, and pest-free. Ready, set, inspect!


